

More than 60 percent of smartphone users store their primary photos, messages, and personal data only on their phone, according to a report by Statista. That means a single repair mistake, reset, or hardware replacement can wipe out years of memories in minutes.
Most people think about protecting their phone physically during repair, but data safety often gets ignored until something goes wrong. A cracked screen, battery replacement, or charging port repair might seem routine, yet technicians often need full device access to complete the work.
If your phone is heading to a repair shop or even a DIY repair on the kitchen table, preparation matters just as much as the repair itself. A few simple steps can prevent data loss, privacy issues, and account headaches later.
In this guide you will find a clear checklist for protecting a phone during repair, including data backup strategies, photo protection, and account security.
Why Protecting Your Data Before Phone Repair Matters

Sending a phone for repair always carries a small but real risk. Even reputable repair technicians sometimes need to reset devices during troubleshooting or hardware replacement.
Certain repairs, especially motherboard or storage related work, may erase internal data completely.
Another factor is privacy. Phones today hold banking apps, private photos, documents, and saved passwords. When a device leaves your hands, it is wise to assume someone may temporarily access the system during testing.
Preparing your device ahead of time reduces several risks:
- Accidental data loss caused by system resets
- Exposure of personal photos or files
- Access to email, banking, or social accounts
- Loss of contacts and saved passwords
A few minutes of preparation protects both your information and your peace of mind. Think of it as creating a safety net before anything happens.
Choosing Safe Tools If You Plan a DIY Phone Repair
Many users prefer fixing minor issues themselves. Screen replacements, battery swaps, or cleaning internal components can often be done at home with the right tools. However, safe tools matter more than people realize.
When opening a phone, using sharp household tools can damage internal connectors or scratch the motherboard. Purpose built repair tools are designed to apply controlled pressure without harming delicate components.
For example, a cell phone pry tool helps separate screens, batteries, or connectors safely during disassembly. These tools are thin, flexible, and built specifically for electronics work.
Using proper tools reduces the chance of accidental damage during repair. It also helps avoid unnecessary force when opening a device.
A safe repair setup usually includes:
- Plastic opening picks
- Precision screwdrivers
- Anti static tweezers
- A soft workspace mat
- Magnetic screw trays for organization
When working on a device yourself, careful preparation prevents both hardware damage and data loss.
Step 1: Create a Full Data Backup Before Any Repair
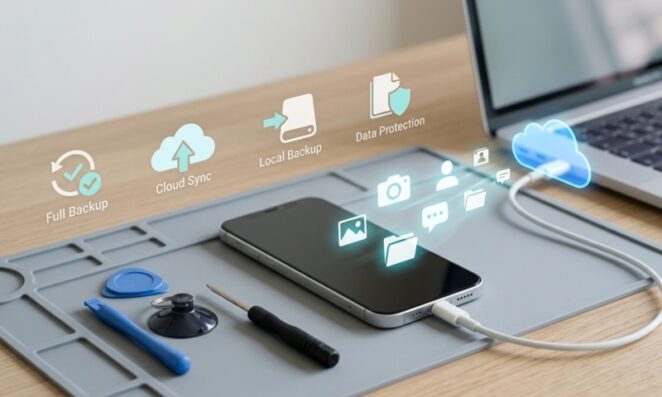
Backing up your data is the single most important step before a phone repair. A proper backup ensures that photos, messages, contacts, and apps remain safe even if the device must be reset.
Most modern phones offer two main backup options.
Cloud Backup
Cloud services automatically store important files online.
Common options include:
- Apple iCloud
- Google Drive
- Samsung Cloud
- OneDrive
Cloud backups often include photos, app data, contacts, and settings. They also allow easy restoration to a new device if needed.
Local Backup
Local backups store data directly on a computer.
Benefits include:
- Faster backup speeds
- No internet requirement
- Full device image storage
Local backups are especially useful for large photo libraries or video files.
Important fact
Some repair procedures require factory resets. Without a backup, all stored data may be permanently deleted.
Ideally, perform both cloud and local backups before sending your phone for repair.
Step 2: Protect Your Photos and Personal Files
Photos are often the most irreplaceable data on a smartphone. People store years of family memories, travel photos, and personal media on their devices.
Backing them up is essential, but an additional layer of protection is recommended before repair.
Start by confirming that photo sync is enabled in your preferred service.
Common options include:
- Google Photos
- Apple Photos with iCloud
- Dropbox camera uploads
- Amazon Photos
After syncing, verify that the images actually appear in your cloud account.
Did you know?
Many repair shops report that photos are the most commonly lost files after accidental factory resets during repair testing.
For added protection, copy your photo folder manually to a computer or external drive. Having two copies ensures your memories stay safe regardless of what happens during repair.
Step 3: Sign Out of Important Accounts

Phones today store automatic logins for email, social media, banking apps, and cloud services. Before handing a device to a technician, signing out of sensitive accounts reduces privacy risks.
Start by reviewing apps that contain personal data.
Examples include:
- Email applications
- Banking and payment apps
- Cloud storage services
- Messaging apps
- Social media platforms
Removing accounts from the phone ensures no one can access your data while testing the device.
Below is a quick checklist that helps simplify the process.
| Account Type | Action Before Repair |
| Sign out or remove account | |
| Banking apps | Log out and disable biometric login |
| Social media | Sign out from mobile app |
| Cloud storage | Confirm backup then log out |
| Messaging apps | Backup chats before removal |
Once repair is complete, accounts can be added back easily.
Step 4: Disable Screen Locks and Tracking Features
This step may sound counterintuitive, but it helps repair technicians test the device after repair.
Some repair centers request temporary removal of screen locks or tracking features. However, the safest approach is slightly different.
Instead of removing security entirely, adjust settings carefully.
Recommended steps include:
- Remove biometric unlock methods such as fingerprint or face recognition
- Keep a simple temporary passcode
- Disable device tracking features temporarily if required
Features like Find My iPhone or Find My Device sometimes prevent technicians from completing hardware tests.
Tip: Write down your passcode before changing security settings. Many users accidentally lock themselves out after repairs.
Security should remain active, but simplified enough to allow necessary testing.
Step 5: Remove SIM Cards and External Storage
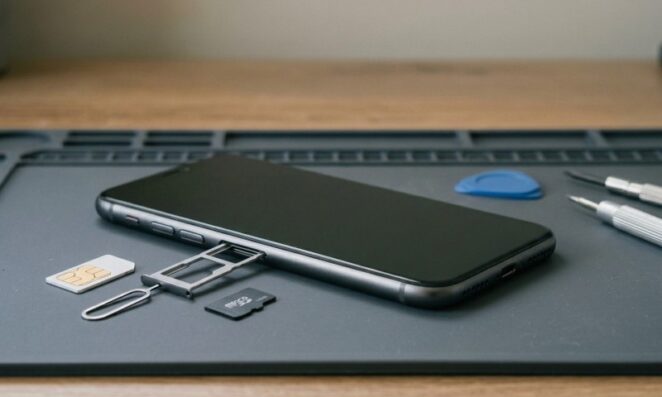
SIM cards and memory cards contain personal information that does not need to be present during repair.
Removing them protects both data and your mobile account.
Items to remove include:
- SIM card
- MicroSD card
- External storage accessories
- Phone case with embedded cards
SIM cards contain contact information and authentication data used by mobile networks. Keeping them with you prevents unauthorized use.
Memory cards often store photos, music, and downloaded files. Removing them avoids accidental formatting during repair diagnostics.
This small step often takes less than a minute but protects sensitive information.
Step 6: Document the Condition of Your Phone
Before sending your device to a repair center, documenting its condition protects you from misunderstandings later.
Take several photos of the phone from different angles. Focus on visible scratches, dents, or cracks.
Useful documentation includes:
- Front display condition
- Back panel and camera area
- Charging port and buttons
- Frame edges
Keeping a record helps verify that the device returned from repair matches its original condition.
Subnote
Some repair shops already perform this step internally, but personal documentation provides an extra layer of protection for customers.
It also helps clarify warranty claims if any additional damage appears after repair.
Step 7: Perform a Final Pre Repair Checklist
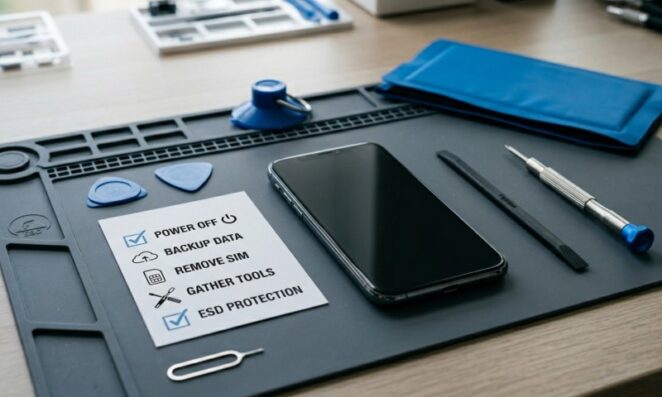
Before handing over your phone, a final quick checklist ensures nothing important was missed.
Take a few minutes to confirm each item.
- Data backup completed successfully
- Photos synced and copied to another device
- Accounts signed out or removed
- SIM and memory cards removed
- Security settings adjusted if needed
- Device condition documented
Many people rush this process, especially when a broken phone feels urgent. However, slowing down for five minutes can prevent days of frustration later.
A simple checklist keeps everything organized and reduces the chance of overlooking something important.
Before You Hand Over Your Phone
Phones hold more than apps and contacts. They carry personal memories, financial access, work files, and everyday digital life.
Sending one for repair without preparation is similar to handing over a laptop filled with private documents.
Protecting your device during repair does not require technical expertise. It simply requires a clear process.
Back up your data. Secure your photos. Remove accounts and sensitive items. Document the device condition before repair begins.
Following these steps transforms a stressful repair situation into a controlled process. When your phone returns working again, you will still have everything that matters safely stored and ready to restore.